I recently discovered NASA World Wind - which could be described as the NASA version of Google Earth. The project is part of the NASA Vision Workbench, and something I find interesting about it is that it's Open Source. When I worked on the thesis, using Computer Vision and Computer Graphics, I found some of the code from World Wind, but had to remake it to work and to fit my settings. I published my revised code in an old post, and just like the World Wind team I didn't come to the point where the disposing is done of video on a surface in DirectX. Even though I found out in the end how to do it I also found out that using video on a surface wouldn't be beneficial for my project....
Now I'm trying to decide what to use for my next little project, Google Earth, Google Maps, Yahoo Maps or maybe NASA North Wind. I'll be creating a photo-map-story-blog, showing photos I take with my new camera in different cities and with different stories to them....
Sunday, April 15, 2007
Thursday, January 11, 2007
New side track - Ruby on Rails (Swedish report)
Well, it seems like I'm finding new tracks all the time at the moment. Today, I was asked to make a report about Ruby on Rails to accompany my CV to send to a company who needs a project manager/developer/tester. Since I'm a nice guy, I decided to share the report here (it was very quickly made, so don't take this post as an absolute truth). The report is in Swedish, and I haven't found any translation for it. If you don't know Swedish, I can recommend the links at the bottom, which are in English (and probably some of the easiest to find) and places where I found the information.
Ruby on Rails (RoR)
Teknisk sammanfattning
Fördelar
Nackdelar
Tips för optimering
Slutsatser
Mer läsning
Referenser
Ruby on Rails (RoR)
RoR har som filosofi att använda så lite kod som möjligt i sina applikationer, och att definitioner enbart ska behöva göras en gång (”Don’t repeat yourself” eller DRY). Detta gör i slutändan att applikationer som utvecklas med Ruby behöver mindre kod, om man följer konventionerna. En sida sammanfattar Ruby som en kombination av Smalltalk’s konceptuella elegans, Pythons enkelhet i användning och inlärning och Perls praktiska nyttovärde. Det är mycket vanligt att använda Agile programming vid utveckling i Ruby on Rails.
Referenser till webbsidor finns på slutet, för mer läsning – då texten refererar till en av dessa görs det med en siffra mellan klamrar (t.ex. [2]).
Teknisk sammanfattning
RoR använder sig av metaprogrammering, vilket ger möjligheten att skapa ett domänspecifikt språk, vilket många programmerare finner mer produktivt än traditionella frameworks.
Fördelar
- En given fördel är att man kan få önskade resultat med minimal mängd kod. Enligt vissa källor är RoR cirka tio gånger snabbare än Java vid utveckling till webben, utan sänkning av kvalitet.
- Språket är väldigt enkelt att lära sig, och det finns ett antal böcker i ämnet. På Amazon finns minst två böcker i ämnet som ges högsta betyg av reviewers.
Nackdelar
Alla system har sina för- och nackdelar, så även RoR. Ofta när väldigt mycket funktionalitet ska uppnås med väldigt mycket kod så ger det försämringar på andra områden. Motsatsen skulle man kunna säga är C/C++, där mängder av kod måste skrivas även för relativt enkla funktioner, men då ger ett snabbare och mer effektivt slutresultat.
RoR har några prestandaproblem som verkar följa med oavsett typ av applikation. En rapport [1] inkluderar vanliga fel och problem i testade applikationer med RoR:
- Val av långsam session container.
- Även saker som borde kunna utföras enbart vid applikationens start följer med på en ”per request” basis.
- Repetitioner av identiska beräkningar under request processing.
- Läser för ofta och för mycket från databasen.
- Förlitar sig för mycket på ineffektiva hjälpmetoder.
Vissa av dessa går att arbeta runt, medan andra antagligen kommer att förbättras till nästa release av RoR. Något som gör RoR långsamt är Route igenkänning och Route generering. Hämtning av ett flertal ActiveRecord-objekt är ganska långsamt, pga hur dessa objekt representeras i RoR (se i nästa sektion, ”Tips för optimering”).
Ännu en nackdel är att den officiella dokumentationen är bristfällig, och det verkar finnas svårigheter att hitta bland dokumentationen – men å andra sidan har ett antal böcker kommit ut den senaste tiden, vilket ofta kan uppväga brister från officiella kanaler.
Tips för optimering
RoR kommer med flera valmöjligheter, och det rekommenderas att man testar prestanda på applikationer med olika inställningar – detta kan göras med Railsbench [2]. Några tips för optimering:
- RoR innehåller flera olika session containers, där de flesta verkar använda PStore (sparar session information i separat fil) eller ActiveRecordStore (sparar i databas). Alternativ som tycks vara bättre är istället SQLSessionStore och MemCacheStore (se mer i [1]).
- Beräkningar i cache – om man behöver utföra samma beräkningar flera gånger under samma request så är det mer effektivt att lägga datan i cache (se [1, Caching Computations])
- Lägg beräkningar vid applikationens start som bara behöver utföras en gång – ett ganska enkelt tips, men flera programmerare låter vissa beräkningar utföras vid varje request som bara behöver utföras då applikationen startas.
- Optimera queries – det finns ett antal tekniker för att optimera databas-queries, så att hämtningar från databas delas upp så enbart det som behövs hämtas (se [1, Optimizing Queries])
- Undvik långsamma helpers – ett flertal helpers i RoR är relativt långsamma, vilket gör det viktigt att optimera användningen av dessa (se [1, Avoiding Slow Helpers])
Slutsatser
Ruby on Rails ser ut att vara ett bra verktyg, om man vill använda så lite kod som möjligt för att utföra så mycket som möjligt. Det är dock viktigt att man undviker de värsta fallgroparna, och testar applikationer för att kunna optimera prestanda. Nackdelarna som räknats upp är mestadels vanliga fallgropar, och kan oftast undvikas genom att lära sig rätt metoder från början. Fördelarna överväger därför, med snabb och effektiv programmering.
Mer läsning
Wikipedia [3] har en del information, officiell API-beskrivning finns på [4] och installation finns på [5]
Referenser
[1] http://www.infoq.com/articles/Rails-Performance
[2] http://railsbench.rubyforge.org/
[3] http://en.wikipedia.org/wiki/Ruby_on_Rails
[4] http://api.rubyonrails.org/
[5] http://www.onlamp.com/pub/a/onlamp/2005/01/20/rails.html
Sunday, January 07, 2007
New side project - Ajax CV
I've decided on creating a new small side project, which should work well with my job search while hopefully also teaching me something new. A simplified description is that the site should show my CV accompanied by a calendar with the usual year, month, day interface selection. I'll also decide of information should be saved in a database, or an xml file (I'd usually just make it in mysql, but I I'd like to improve my understanding of xml).
To refresh my memory of Ajax, I'll start by going through the developerWorks 'Mastering AJAX' series, occasionally sidetracked by tutorials on for example drag-and-drop interfaces and form accessibility with unobtrusive javascript. Using this, entries in the calendar will be easy to move from different days or times, and both time and date as well as different types of entries (of course depending on labels) can be easily searched. If anything is unclear in a CV then, this calendar should be simple to search for example to find the projects on certain dates, or the length in time of certain projects.
I'll be updating here, while working on the project, and can hopefully give more tips related to this type of development :-)
Meanwhile, I am of course continuing the development of 'Pho2Model' - which I'm also trying to think of a new name for (there's a similar application with a very similar name). I'm almost done implementing a solution which should make the triangulation much more robust. If this doesn't work well enough, I have limited time to implement a method I have seen in several similar applications, meaning there will be three tested methods. At least I know which conclusions to draw from each part already, even though the testing is far from done (I'm 95% certain I won't be proven wrong by further testing).
Thursday, December 28, 2006
Reconstruction improvement
A Christmas of thesis writing is not what I would expect of a great Christmas, but still it was pretty nice! People were happy and having fun throughout the day, and there was only minor fighting (the stepfather can't go a day without sharing his arguments which have no basis in reality). In other words, a nice Christmas even though it was only a single day free from writing and coding...
I have come to terms with a basic failing in the application, which doesn't reconstruct nearly as well as it should. I believe I know two additions which could fix the algorithm, but with less than a week left, it's not realistic to believe in such a solution. The additions would be:
I have come to terms with a basic failing in the application, which doesn't reconstruct nearly as well as it should. I believe I know two additions which could fix the algorithm, but with less than a week left, it's not realistic to believe in such a solution. The additions would be:
- The addition of a point correspondence correction algorithm (by the original authors dubbed "the optimal solution"). This would correct clicked image points depending on epipolar constraints, which in turn would benefit the triangulation of 3D points.
- Iteration in the algorithm. After reconstructing a set of 3D coordinates, these should be tested by projection back into the image frame - if the results of this re-projection are inaccurate, make a new estimate of the camera pose, which is then used for a new triangulation. After all, the first pose estimation is only done with four manually defined image points, and each point after that is also clicked manually, of course leading to a great deal of error in the reconstruction. Perhaps a similar iteration could be applied to the calculation of the fundamental matrix, the algebraic representation of epipolar geometry.
Sunday, December 17, 2006
3D Reconstruction from photos and Image noise
For some reason, I had missed a basic step when creating my algorithm for 3D reconstruction from photos. The step, which I have been careful to consider in all similar previous projects, enforces an epipolar constraint and thereby "fixes" the problem of image noise.
The reconstruction done without enforcing this constraint is quite lousy, to say the least. Instead of searching through the software I created for errors (I've created quicker code, but not found any errors after using several methods of searching) I have decided to use 2-3 days for implementing a much more advanced algorithm, which enforces the epipolar constraint, and thereby "fixes" the problem of image noise...
If you're interested, an article named "Triangulation" from Hartley and Sturm, published in 1997 (sorry if any detail is wrong, no ill intention).
Hope this post helps you,
E.Hunefalk [First name not included because of spam risk - with some luck my thesis will published in 2007 though, so the name shouldn't be difficult to find :-)]
Saturday, October 21, 2006
Side project - Rhino3D Stadium modelling
 I just started a small side project, to relax from the programming with some 3D modelling - even though I'm programming a 3D modeller. Does that sound weird? Well, I can live with that...
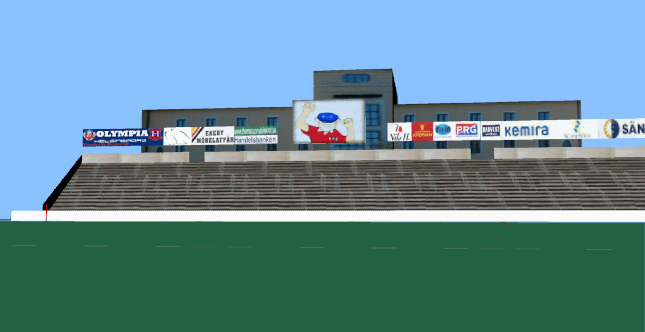
The first image to the right is what the model looks like after a days work. I base it on images from Stadionwelt.de and measurements from the city archives. The stadium is called Olympia, and
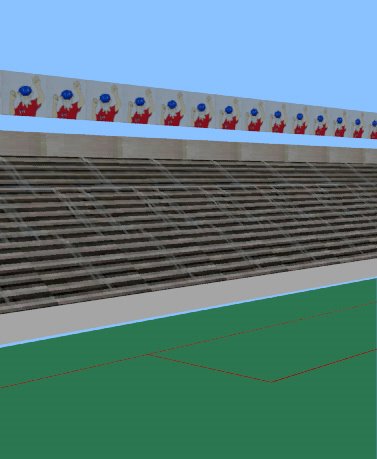 stands in the city of Helsingborg, Sweden. I've been looking a bit on a couple of tutorials for the conversion of the stadium into games such as FIFA 07 and PES. The process of building the stadium is pretty straight forward, simply using surfaces to create one small part at a time. This way, I created a single part of the South Stands of the stadium and then copied it to be the same size as the pitch width (second image, on the left side).
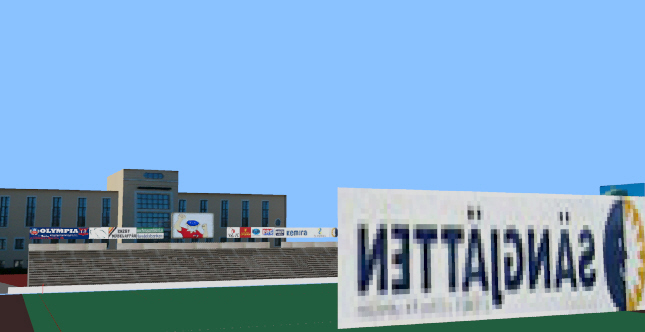
From this, it was easy to change the textures (which were originally applied by simply selecting a quad and setting the basic material texture to whichever image was needed for that piece) and get the result on the next image. Before rendering that image, I also substituted a couple of ad screens for a big screen where re-runs and video from other matches are shown.
The arena has two standing short sides, while the long sides are seated. The short sides basically look the same, while the long sides have very different features from eachother. The stadium is seen as Swedens most beautiful, but will be rebuilt to accomodate more people in a few years.

Wednesday, October 11, 2006
Modelling application
So I've been working on a modelling application in its simplest sense...
The shortest summary I've been able to create works as follows [extreme draft, but comments are still welcome]:
The shortest summary I've been able to create works as follows [extreme draft, but comments are still welcome]:
Modelling
The modelling section of the application consists of three subparts. These are called Pre-modelling, Parameter Value Generation and Post-modelling. In short, the system lets a user create models from his or her perception of the object of interest, followed by the step where images are used to find distances between different coordinates in the object and finally the user goes into the post-modelling part of the system, to correct possible mistakes made in the previous parts of the process.
Pre-modelling
Here, a user can specify how a building, or object (hereafter all specified as buildings), is put together. This is done by fitting different ‘blocks’ together, where a block could for example be a cube to model the base of the building or a pyramid for the roof. In this part, a user can specify parameter constraints, both in the same block and between different block. For example, the height is often the same at the four corners of a house, while the roof is aligned in all four directions of a square building, and also has its bottom at the top of the base.
The camera can be moved to fit background images, or the user can simply model on-the-fly.
Generating World Coordinate Values
In this part of the process, the user specifies 2D image coordinates – most often in photos – which correspond to 3D world coordinates for the final model. This is the most work intensive part of the process, and consists of three steps:
1) Find the Fundamental matrix (F) between images. By clicking on at least seven corresponding points the minimal solution, RANSAC or the eight-point algorithm can be used. Together with the cameras intrinsic parameters K and K’ the Essential matrix (E) can then be found. Through SVD the camera rotation and translation are derived.
2) For each point correspondence compute/triangulate the corresponding 3D space coordinate X that project to those image points. Initialize structure from two views. For each new image/image pair:
a. Determine pose
b. Refine current values (see more on point 3)
c. Extend structure
3) Weigh points depending on angle compared to camera – Better angle (width etc.) when straight forward than at narrow angle. All surfaces are two dimensional, and should be evaluated as such before moving to the third dimension. Pick corners in post-modelling stage by putting boxes (primitives) at each vertex. When vertices are the same for multiple surfaces, only use one box (which can be picked to change values).
4) Move coordinates to set one model corner at world origin (must stand on ground, with one corner at (0,0,0)). Show with a ground plane, and let user change coordinates. This way, we’ll align this corner with the tracked points from a video stream, where one corner should be set to (0,0,0) and the width/length of the tracked square should be set to the width/length of the modelled building.
5) Save mesh: Save the model as x-file, move texture images to assigned folder together with ".x"-files
With all these parameters, the application calculates 3D world coordinates depending on which coordinates have been specified from images, which different parameters should have the same value and if one or other value is unlikely for the world coordinate.
Post-modelling
This part is very similar to the pre-modelling. Here, the user can look at the values given from the second step of the modelling process, and for example change single values (such as block height or width) or set new alignments if an error is found. From this step, it is also possible to go back to the second step of the modelling process, to refine the measurements or even add new parts of the building. This way, the user can create one part of the building at a time, if details are needed. Also, a rougher initial model can be created to see an early sample of the building.
The post-modelling part of the system lets the user set the camera to the transformation used in specified images, which can then be used as background to a wireframe version of the model.
Texturing
The texturing process from the users point works by finding corners of the surfaces which are wanted as texture images. After specifying the same four corners in a number of images (1-N), the user lets the application work in the following way:
For each texture image pixel (x,y) coordinate:
- Use the specified corners and specified texture size to calculate the homography from image to texture.
- Use the homography to find the pixel colour value (0-255) in image i, and put the value in a histogram together with all corresponding coordinates from the specified images.
- Find the histogram bin with the highest occurrence, and use this to set the textures corresponding pixel colour value.
- If the resulting texture image gives an unsatisfactory result, remove or add more images and go back to step one. The result might be unsatisfactory due to for example partial occlusion, image artefacts (if using too few images), pixelated regions (due to perspective distortion in the original image, or the texture size being too small comparing to how close the camera gets to the finished model) or a too blurry image.
Subscribe to:
Posts (Atom)